 Skip to content
 Do you also want to learn how to wire a 220-volt well pressure switch? It is a simple task to wire a high-pressure switch while troubleshooting, repairing, or installing if you have basic electrical knowledge. If you have an excellent grip on the inside wiring diagram of a switch box and a few steps of making wire connections then there is no need to call a professional.
But it is good to know entirely about the complete process because the high voltage will pass through these switches during pump operation. Although the wiring process is simple, ensure you understand the wire set and main components like the pump and pressure tank, etc. If you want to do this by yourself, this guide is for you, so read the procedure for good pressure switch wiring.
Supplies & Tools Needed
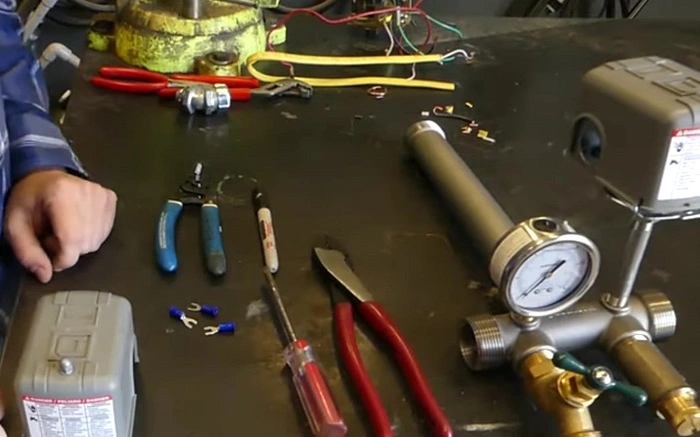
Before starting a 220-well pressure switch wiring, you should need some tools and supplies. They are as follows:
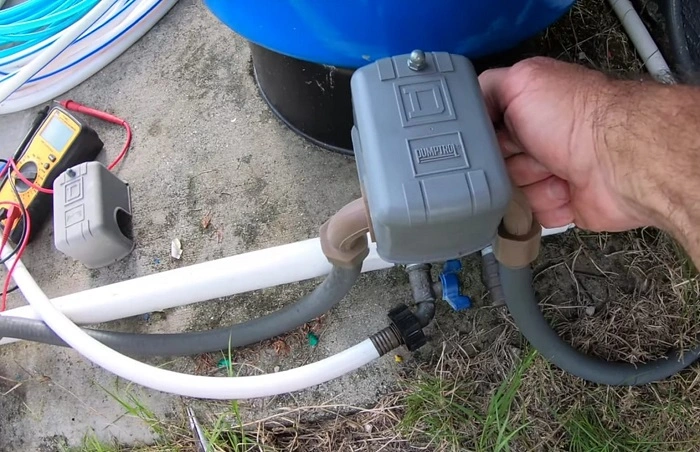
Voltage meter: through the voltage meter, you can check whether the power is off or not.
Screwdriver termination: with a screwdriver, you can lose the screws, remove or reinstall the cover, and make the wire terminations.
Wire strippers: used for removing the insulation from the individual wires,
Wire crimpers: used for the crimp fork connectors from the ends of individual wires.
Fork connectors: will be used to crimp on the ends of wires to make the connection secure and safe.
After having all of these tools, you can start the process of pressure switch wiring. All of these supplies are very helpful for making the connection and re-installation.
How to Wire a 220-Well Pressure Switch
There are two rooms on the breaker panel in a 220-volt well pressure switch, so locate the circuit breaker of your good pressure switch and shut it off.
After this, verify the type of wire system of your pump. To start this process, use the above tools. Although you can start this process without these tools, they can accelerate your process, so it is good to use these supplies.
Step 1 – Verify There Is No Power and Release Pressure
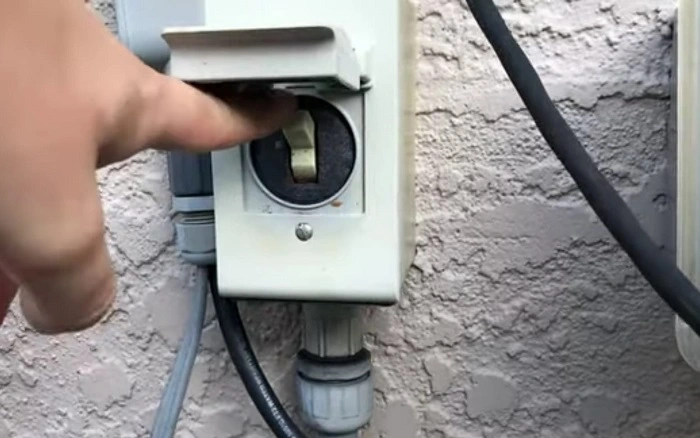
Before starting the process, ensure the breaker feeding your good pump is turned off. Remove the cover of a well pressure switch, check the wires with a volt meter, and verify that there is no power in the switch. For this, touch the probe to one end of a hot wire and the other probe to the ground wire. It is essential that the reading of your volt meter is zero.
Repeat the same process for the second hot wire. After ensuring the power is off, run the regulator for only a few minutes so the pressure will be released from the switch. But the reading of your pressure gauge should be 0 PSI.
Step 2 – Strip the Ends of the Wire and Crimp on the Forks
Remove the insulation from the wire about 1/2 inch with the strippers. After that place the barrel of fork connectors at the end of the wire and, with the use of crimpers, crimp fork connectors onto the wire. Make sure to give an excellent tug to the connection and use a quality crimper.
The connections should tighten adequately, otherwise, the loose connections can create problems for passing power. In most cases, it can cause a hot spot that may lead to a fire.
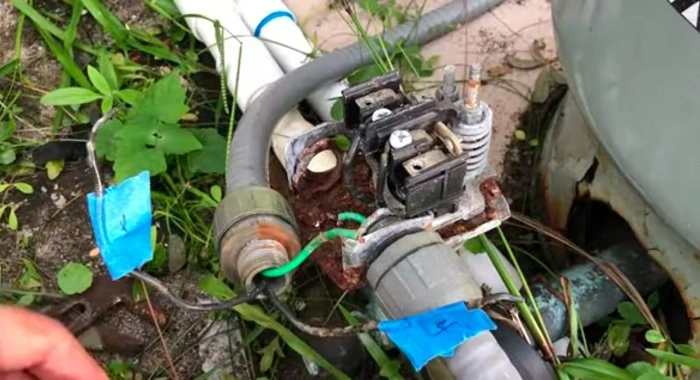
Step 3 – Wire the Pressure Switch
Now it’s time to wire the pressure switch and thread back the wires into the switch. Carefully establish the wires that come from the pump and power source. At this point, it is essential to find out what type of switch you are using. There are two well-pressure switches, and here’s how you can find them.
Two-wire well pressure switch: your pressure switch will have two wires. If the wires come from the motor, don’t make a branch and go straight to the pressure switch.
Three-wire well pressure switch: the pump pressure switch with three wires if the wires from the duct of the pump go through the control box before the pressure switch.
Steps for Two-Wire Pressure Switch Wiring
Follow the below steps if you have two wire well pressure switches. Carefully read all the steps and follow the instructions for 220-volt well-pressure switch wiring:
- Make sure to switch off the power connection of the pump. Then verify the power cut-off by using the volt meter or tester. If there is no reading or any sign of electricity, then go ahead for the next step.
- Remove the remaining water from the pump using a faucet, garden hose, or water duct. It is vital to release the pressure from the pump.
- After this, locate the holder of the switch box. If you want to use a new switch, take a photo of the old wiring, as it will make the new setup easy for you. Marking or labeling is also beneficial, however, the wiring is straightforward and you can install it without marking or labeling.
- Now determine the cut in pressure of the new switch. However, it is good to have a lower pressure in the pump, which should be 2 PSI below the cut-in pressure.
- After this, put the switch and then the ends of the wires inside the switch box. You can do it easily from the feeding holes on the side walls. It is easy to connect the wire tips and fork head. Clip a half-inch insulator and turn it clockwise on a specific screw if you have standard wire tips, according to the excellent pump diagram.
- While wiring the well pressure switch, it is vital to know each wire and understand where to connect the wires. This first step is to determine the power supply wires and connect them with the line terminals or 1 and 4 terminals. You can also connect them interchangeably because no problem will be created due to this connection.
- A green ground wire comes from the power circuit and connects it to the ground screw, which is fixed to the box’s ground.
- After this, determine the motor wires and connect them to the LOAD terminals or 2 and 3 terminals. There is no need to worry if you mix both of the terminals but only make sure to connect them with 2 and 3 terminals, then it will be fine.
- Fix the ground wire to the second ground screw. It is vital because when you ground your motor, it will save your pump from any sudden accident.
- Close the feeder hole of the switch box properly using cork or rubber. Most well-pressure switches contain a built-in rubber pad for closing the feeder hole.
- Verify that all the connections are sturdy enough and capable of resisting moderate pressure. Also, confirm that they will not be in touch with each other.
- Now set the wire outlets so you can quickly put the covers on. Close the covers and fix them by tightening the screws with screwdrivers.
- In the end, turn on the power breaker operate the motor for a few minutes, and check the stability. If it works well without any problem, then you did it successfully!
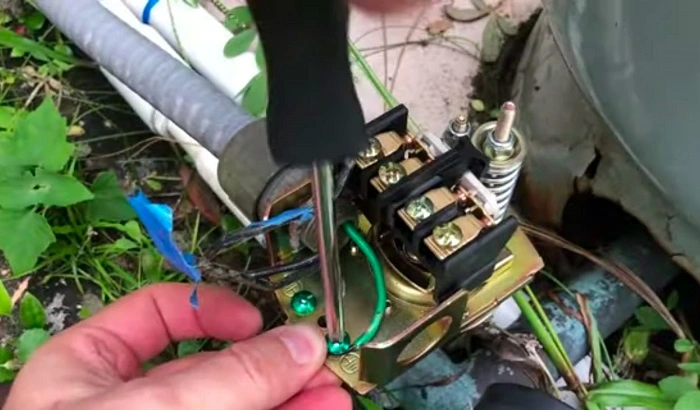
Steps for Three-Wire Well Pressure Switch Wiring
Now it comes to the three-wire well pressure switch. For its wiring, read the below guide and follow the instructions carefully:
- The first step is to check whether your pressure switch doesn’t have any voltage from the outlet.
- Then replace the old switch with the new one.
- The three-wire switch has yellow, red, and black insulation-covered wires. So connect the three wires in the control box, which may be labeled as Y, R, and B, respectively.
- After this, connect the green ground wire to the ground screw.
- L1 and L2 ports attach the power supply to these ports—no need to worry if you connect the power supply wires interchangeably. But make sure to connect the green ground wire to the ground screw. To avoid any accident, ensure to ground your motor.
- Cover all the outlet holes with rubber or cork to avoid water splash.
- Ensure all the connections are secure and capable of resisting optimum pull pressure.
- Arrange the wires and screw up the cover of the well pressure switch.
- After fixing the cover, power the motor on the breaker panel and check that it works properly. If everything goes well, then excellent. You did it!
Step 4 – Replace the Cover and Re-power
After making the connections, double-check them and ensure they are secure enough and there will be no loose screws or fork connectors. Fold the excess wire so the cover will easily set in place without pinching the wires. After completing the process, turn on the power supply from the breaker, and your 220-volt well pressure switch wiring is complete.
Final Thoughts
I hope this step-by-step guide proves helpful and you can understand how to wire a 220-volt well-pressure switch. Nothing is more frustrating when you find out that your well pump has no water pressure. If you are looking for a way how to wire a pressure switch, then do not worry it is easy to wire a good pressure switch. However, safety matters a lot so turn off the power supply from the breaker and then have a look over the pressure switch before restarting. It is good to call your electrician for the services if you do not know about electrical systems.
FAQs
1. How Do You Wire a Deep Well Pressure Switch?
If you want to connect the deep well pressure switch, then connect it as per the 220-volt pressure switch wiring diagram. There is an instruction page inside the switch box cover with a complete, step-by-step guide. Wire a deep well pressure switch by following the instructions on the paper and make your switch secure.
2. Where Do the Wires Go On a Pressure Switch?
Wires from the motor should go to the 2 and 3 terminals for the 2-wire system of R and Y. If the switch has three wires. Then the wires from the breaker go to the 1 and 4 terminals or L1 and L2 terminals. Before making connections determine all of the wires.
3. Can You Wire a Pressure Switch Wrong?
There is no need to worry if you interchange the two wire ports of power supply wires and if you mix the wires of motor connections. But ensure that the hot wires are carefully connected to 1 and 4 terminals and motors wires on the 3 and 4 terminals. You can also make connections according to the guide.
4. Is There a Positive and Negative On a Pressure Switch?
There are two different pressure connections on the pressure measurement devices, and you can measure from them. One connection is high or positive (+), and the other is low or negative (-).
Muhammad Kashif is a gardening expert with an impressive 13 years of gardening experience. His educational background includes a post-graduate degree in Agriculture
